Picfolio Scrapbooking
A quicker and cost
effective alternative to traditional scrapbooking
What stops you from scrapbooking as much as you’d like?
Time? Space? Creativity? Funds? Picfolios help with all of those road blocks.
But before we talk about those we should probably talk about what a picfolio
is. Basically imagine Mr. Photo Album and Mrs. Scrapbook had a baby… they’d
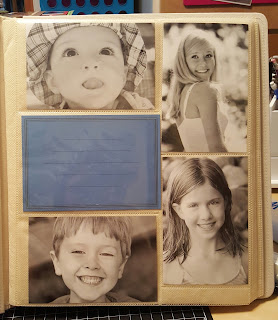
make a cute baby picfolio. It’s an album that holds 3 horizontal and 2 vertical
4x6 pictures. CM horizontal spaces are slightly larger than 4x6.
(Recollections brand in black and Creative Memories brand in cream)
Where do you get these albums? To my knowledge there are
currently 2 places – Michaels and Creative Memories (CM). Creative Memories was
where I first encountered the picfolio. At the time, these albums were made so
that pages could not be removed or added. They cost about $45 and were very
well made. 1 of the 5 slots was larger than 4x6 and there was a small section
to add a tab. Later CM designed albums that had picfolio style pages combined
with tradition full size pages and the albums could have extra pages
added/removed. Then Michaels brand “Recollections” came out with a similar
album however you wouldn’t find it with the other scrapbooks but rather back
with the photo albums. They come in a variety colors and outer fabric options
(shiny fabric and leather-ish). They are cheaper and you can use a 40% coupon
on them. Although they are not AS well made as the CM ones they are great
albums and I have used them many times and am very happy with them so the $$
saved can be spent elsewhere. Also, the albums at Michaels aren’t called “Picfolios”,
that is a CM term but I have adopted it to all “pocket scrapbooks”. Just like
people ask for a Kleenex but don’t necessarily mean “Kleenex” brand, just need
a tissue…. Make sense? Lol Clear as mud!

(Recollections brand on left - Creative Memories brand on right)
So how do using picfolio albums save money, space, time, and
help with creativity blocks? Let’s start with money. Since there isn’t 1 large
space you don’t need full 12x12 sheets of paper which is most expensive. You
can buy the 8.5x11 paper packs when on sale or you can use scraps, or the small
paper pads. So you save a lot on paper. There is less space to decorate so you
save on embellishments (but we will talk about embellishments a little later –
those are fun and still get used). Time is always a factor. With a picfolio you
can organize your pictures and fill the album with what pictures you want on
each page. It’s fine if there are 5 photo slots and you only have 4 pictures –
one of those boxes and become a title section, journal box, or embellishment
section. What happened when you have 5 horizontal pictures but there are only 3
spots for horizontal pictures? No problem …. We can trim the photos down and
make them 4x4 and add some decoration above/below them.

(Don't have 5 pictures? just add a journal box and/or large title)
Picfolios also save you time because you are not staring at
a full 12x12 pages and have to start from scratch. This is where the creativity
block comes in. You only have 5 possible places to put your pictures and then
it’s just a matter of choosing paper, trimming pictures, matting them, and
adding some fun embellishments and possibly making a title or typing a journal
box. Typing journal boxes is easy. Open Word on your computer and then click on
“Page Layout” at the top and click on “Size”. Here you can change your paper
size to 4x6 and when you print, print on 4x6 photo paper (which is cheaper than
you think – I get mine on sale at Staples). I personally like typing my journal
boxes because I can change the font, size and color. However, you can always
handwrite your journal boxes as well but definitely try to add journaling to
your pages. You think you’ll remember it all but you won’t. To add on to the
“time saving” aspect. I printed and organized all the pictures I wanted to use
for my nephew’s 1st year picfolio book (this was my first picfolio).
I was able to complete it in 2 weekends. Had I chosen to do a 12x12 album I can
guarantee it would have taken me 10 times longer… if not more… I was completing
pages left and right.

(Journaling, embellishments, quotes and all other fun things can be used still)
Ok … so many you are worried about memorabilia that you want
to add but it’s larger than 4x6 …. Yes, this is an issue but not a deal
breaker. Sometime memorabilia can be trimmed to fit, or cut in half and split
between two boxes. Another option is to scan or take a picture and print it
smaller. There may be some things that aren’t able to be used … bummer ….
(My nephew's birth announcement was too large to fit in one pocket so I cut it and placed it in 2 pockets)
Space .. yes you still need space to work but I have
completed picfolio albums in much smaller paces than my traditional 12x12
albums. You can work with smaller paper so you may not need a 12x12 paper
cutter. You can place all your pictures in your album so they are ready when
you get to that page. You don’t need as much embellishments so you aren’t
toting all those.


